Thursday, July 5, 2012

Dog Collar that is Actually Cute


Dog Collar that is Actually Cute (Martingdale)

I debated for a while whether I was going to post this or not.  This is such a cheap project with amazing results, I contemplated starting a business making these collars and leashes.  There are so many variations and possibilities with these collars I had pages and pages worth of ideas stored up.  I thought about it for a while and decided I had enough going on in my life, and I didn’t want to be in front of the sewing machine all night (more than I would be already).  So anyways, here it is:

Items needed:
3 Yards Nylon Webbing (1 inch thickness) ~can be bought at Joann’s for approx. $3 a yard, or online for WAAAY cheaper if you can stand the wait for shipping!
1 roll (at least 10 ft) pretty ribbon (5/8 inch thickness)
Coordinating thread
3 d-rings (1 inch width)
Band Adjuster (1 inch width)
1 inch clasp for the optional leash

Instructions:
  • Pin the ribbon in the center of the nylon webbing and sew as close to the edge of the ribbon as you can get on both sides.
  • Cut the webbing
    • 24 inches for the band of the collar (your may need more or less depending on the size of the dog you are making this for…I made this one for our 1 and a half year old Viszla)
    • 11 inches for the center of the collar
    • Remainder will be used for the optional leash
  • Place the three d-rings on the 11 inch piece of webbing. Fold one side over about one inch and sew to the opposite side to make a circle with a one and a half inch overlap.  See picture below.  To sew them together with the most strength sew in the shape of a box with an x through it.

  • Place one d ring as close as you can into the center of the overlap and the place where you just sewed the circle together.  Again take a look at the pic below.
  • Sew the remaining flap shut in the box-x formation.
  • Now we have to set up the adjuster strap.  With the 24 inch piece of webbing, loop one end right side facing in, around the center bar of the adjuster with the box-x formation.
  • Loop the 24 inch strap through the left d-ring from the back to the front so the right side is now facing out. 
  • Now put the strap through the adjuster.  See picture below.
  • Lastly, loop the strap through the last d-ring from the front to the back with a 1 and a half inch overlap.  Sew together using the box-x formation
  • Trim off any strings
Leash:
  • If you can make the collar you can DEFINITELY make the leash.
  • Take one end and fold over about one and a half inches.  Make a loop (whatever size you are comfortable with) and sew down the end using the box-x formation.
  • Place the clasp on the other end and once again fold over about an inch and a half.  Sew down to the leash using the box-x formation.
  • Done.
Total Cost: 
Webbing -$9 (could be around 50 cents a yard if bought on-line)
Ribbon- $2
D-rings- $1
Adjuster- $0.50
Total- $12.50

Thursday, June 28, 2012

Cutie Patootie No Bootie Shorts


Cutie Patootie NO-Booty Shorts

I hate too-short shorts.  I have long legs that make short shorts look teeny tiny-and that is not acceptable.  I also hate mom pants in shorts form.  It seems like there is no in-between sometimes.  So I took matters into my own hands and made my own.

In the very back of my jeans drawer I found a pair of ancient capris.  The kind that end just below the knee with a cuff –2002 called they want their clothes back-  As I would not be wearing them ever again as is, but they still fit good I thought I would try a refashion.

First I tried on the jeans and marked with a straight pin what length I wanted them to end up at. (Then I would add at least half an inch to that to account for fraying in the first wash)

I laid the jeans on a flat surface and smoothed out any wrinkles.  Make sure the jeans are lined up so the fold is exactly on the outside seam.  Next you make your cut.  You can be careful and draw with chalk where you want to cut…or you could just wing it like me.  For a little extra flair I curved the cut upwards when I got close to the side seam.  I really like how it turned out.  (For some extra coverage I might add a little lace in the future)

I also wanted to change up the color a little so I put the shorts in with my whites and bleached them.  They kept most of their color, I think because they were very thin denim with a lot of stretch…maybe a weird blend of fibers?

When I washed and dried them, they lost a little length due to fraying, but they are still much longer than anything I can find in stores…so overall I would call it a success!  Lastly I zipped a quick line around the very bottom with my sewing machine.  This will prevent them from fraying any shorter.

Thursday, June 14, 2012

Cabled Knit Scarf


A few months ago I posted a crafting bucket list that I wanted to finish before I metaphorically kick the bucket.  Well I am working at whittling that list down little by little.  So far I have already finished one item, learning how to ombre dye.  Whoop Whoop! Yay me!
But that was an easy one.  Now I need to focus on the more daunting items on that list.  Knit a sweater that I would be proud to wear, now that one is a doozie.   Before I can even think about the sweater, I have to learn how to knit.

I might have known how to do a knit stitch when I was like seven, but it took so long to get anywhere in knitting, and it wasn’t so forgiving on mistakes so I gave it up.  I found crochet and never looked back!  But you have to admit to look of knitting is completely different from crochet and I am an absolute fool for cables! So I figured it was time.
I chose this scarf pattern and found some left over yarn to practice with.  The Lion Brand website has some amazing visuals for learning the knit stitch, the purl stitch and how to cable.  For this particular pattern each set is 8 rows and then you repeat the same 8 rows over and over until the scarf is the length you want it. 
So just to practice, I knit about 3 sets (but I un-knit about 8-10 sets before I could figure out what I was doing). Haha!  My husband, although normally very supportive of my crafting addiction, said I was a mean knitter and wanted me to go back to crocheting!  Unlike crochet, knitting took a while to get used to the counting and precision.  He would ask me a question and I would shush him and say I had 3 more purls and 6 more knits before I could answer him.

Don’t worry though, it got much easier and now I can almost hold a complete conversation while knitting. Plus after doing about 50 sets I ended up memorizing the pattern.
This is a picture of my work in progress:

I am almost out of yarn which means whether I like it or not my scarf will be at its final length.  Next step: a matching hat.  I have a pattern picked out but it is at an intermediate level.  I am not even sure what all the abbreviations mean.  I am calling in for backup on this one:  Grandma Beth – you’re up!

Tuesday, June 5, 2012

Mint Chocolate Chip Cookies

These were really easy for a week-night treat!

Ingredients:

  • 1 bag Sugar Cookie Mix
  • 1/4 Tsp Peppermint Extract
  • A Few Drops Green Food coloring
  • 1 Egg
  • 1 stick softened Butter
  • 1 Cup Chocolate Chips

Directions:

  1. Preheat oven to 375 degrees
  2. Mix all ingredients together, then fold in the chocolate chips
  3. Scoop onto a cookie sheet
  4. Bake for 9-11 minutes

I never get sick of mint and chocolate. Never! Looking ahead to Christmas I might call these Grinch cookies...


Tuesday, May 22, 2012

Hand Dyed Canvas Slip-On Shoes


To go along with my new obsession with dyeing clothing I decided to dye a pair of canvas shoes.  As soon as I did this, I saw a commercial for the same shoes in Old Navy with a $15 price tag. I got them beat! My shoes only cost me $7! Woo Hoo!

Materials:
Wal-Mart white canvas shoes $4.50
Liquid RIT Dye $2
Elastic $0.50
Fabric Tac glue or needle and thread (leftover from previous casual crafting)
1 cup salt (who doesn’t have this in their pantry)

  • ·         Fill up your stainless steel sink (or large bucket) with steaming hot water.  Fill it up just enough to cover the shoes completely.
  • ·         Remove the laces from your shoes.
  • ·         Dunk the shoes in the hot water until saturated and set aside.
  • ·         Pour in half of the RIT dye and add in one cup of salt. Stir until salt starts to dissolve.
  • ·         Put in your shoes! Mine wanted to float right side up, so I used a plastic spatula to keep them in the dye.
  • ·         Stir them around for a few minutes until you get the color that you want.
  • ·         Drain the sink and run warm water over your shoes until the water runs clear. (make sure to dump out the water in the toes!)
  • ·         Put them outside to dry for at least a few hours.  Because it was rainy out this week it took 3 days for mine to dry inside. Sigh. I am not patient enough for that.
  • ·         Cut two pieces of elastic for under the tongue of your shoes. My pieces were about 3.5 – 4 inches long.
  • ·         I initially wanted to stitch the elastic in, but the canvas is pretty thick and I am lazy so instead I used fabric-tac. Haha.
  • ·         Use the fabric-tac to glue the elastic on either side of the tongue. Let dry.
  • ·         Show off your awesome shoes!


Total Cost: $7


Sunday, May 13, 2012

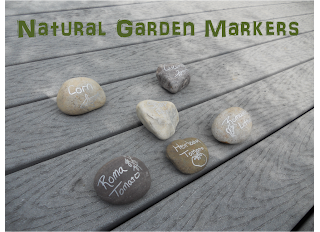
Natural Garden Markers


Well, mostly natural. All you need are some pretty rocks and a Sharpie Marker. I used the silver metallic color because it is what I had in my junk drawer, but I am sure any color would work just as well.

Find the rocks you like, preferably with one flat side and large enough to stay put where you need them. Wash all of the dirt off and thoroughly dry. Once they are dry you can mark them up! 


Easy Peasy. 
Go easy on this picture, I had been digging in the garden for a few hours by this point!

Saturday, May 5, 2012

5 Minute Ombre dye T-Shirt


The first of many I am sure.  This was so easy to do and it only took 5 minutes!  I am seriously going to ombre dye everything I can find this summer.  I might be addicted.

Materials:
$5 Wal-Mart Cotton T-Shirt
RIT liquid Dye
1 Cup Salt

1)  Fill your sink with hot water.  I filled it with steaming hot tap water to about 5-6 inches deep.
2)  Wet your shirt in the water (the one you are dying, not the one you are wearing). Wring it out so it isn’t dripping, and lay it flat on the counter so there are no wrinkles.
3)  Pour in half the bottle of dye and one cup of salt.
4)  Stir until the salt is mixed in with the water.
5)  This part happens quick- dip your shirt in the dye up to the neckline being careful not to splash.  Slowly lift the shirt out of the dye; stopping just below the bust line.  Continue removing the shirt form the dye, pausing at the bottom of the shirt.
6)  Pull the stopper and let the dye drain out of the sink.
7)  Starting at the bottom, run warm water over the shirt moving your way up,  Keep rinsing until the water runs clean.
8)  Lay the shirt outside on a clothesline or flat on a spare towel until thoroughly dried.

Wear with pride!

Total cost: $7.50

Friday, April 6, 2012

15 Minute Storage Bag

We got a doggie!  We are so excited to invite Cali into our family (that’s right…her name is Cali Cail… giggle)! But with the new addition came lots of STUFF...and we quickly realized we had nowhere to store it all.

The biggest issue was all of our gloves, hats, mittens and ear warmers for the early morning walks.  They ended up all over the kitchen table and countertops.  As if it isn’t hard enough keeping the counters free of clutter!
I found some scraps of home décor fabric that I used in the old apartment, and although I didn’t plan it, it was a perfect match for my kitchen! Woo Hoo!

All you need is two rectangles of fabric that are the same size and a long thin rectangle of fabric for the handle.  The size of the rectangles can be whatever you want, depending on how large you want your bag to be. For your reference I used 2- 13X23 rectangles and one 20X2.5 rectangle.
Fold one of the large rectangles in half width wise, right side facing in, and sew a line up both sides.  Do the same with the other large rectangle.
Turn one rectangle right side out and place the 2nd rectangle (still inside out) inside.   With the raw edges together fold the top down ¼ inch, and then down another ¼ inch.  Sew the hem down, getting as close to the hem edge as possible.
Now for the handle:  Fold the narrow, long rectangle in half length wise, with right sides together, and sew up the side to make a tube.  Turn the tube so the right side of the fabric is facing out. Now all you have to do is attach it to the back of your bag.
Cut it to the length you want it to be plus 2 inches. Fold both ends up one inch and pin to the bag.  To make sure the handles would be extra secure I sewed them on in the shape of a box with an ‘x’ inside of it.  If you are not comfortable with this you can just do zigzags back and forth for the full one inch.
Done.  15 minutes right?!
Total Cost: Free if you use scraps!
Here it is all filled with stuff.

Monday, March 26, 2012

Casual Crafting Bucket List


I am hoping if I write down my bucket list and post it for everyone (all eight of you; haha) to see it might give me some accountability; and maybe I will be pressed to actually accomplish it!  That's the hope anyway.

Mallory's Casual Crafting Bucket List
[In no particular order]
  • Knit a sweater I would be proud to wear
  • Enter a quilt into a local fair (and win; or place; or get a ribbon...umm...maybe just enter)
  • Reupholster an antique chair
  • Sew a dress from a pattern (without skipping steps and actually following the directions)
  • Start an Etsy shop or small crafting business
  • Learn how to machine quilt (and no longer be just a 'topper')
  • Invent a crochet pattern
  • Learn photography and photoshop
  • Make a wedding cake
  • Learn how to ombre dye
My goal is to finish one of these tasks before the start of next year. But as we all know- the best laid plans...

Wednesday, March 21, 2012

Dishwasher Magnet


This is a must have for any kitchen...I don't know how I got along without it!
Ok, ok that might be a little bit of an exaggeration, but it is handy!

My husband always leaves the dishes in the dish rack above the dishwasher instead of putting the dishes in the dishwasher itself (where they belong!).  The excuse is always the same- "I didn't know if they were clean or dirty!"

Much to my husband’s dismay, I made a magnet for the dishwasher that shows if the dishes inside are clean or dirty. (Insert maniacal laughter here)

Items needed:
Waste Canvas
Felt
Embroidery Floss
Needle
4 Pins
Glue (not super glue, as I found out the hard way)
Old CD or DVD
Magnet

Trace the outline of the CD onto the waste canvas, and make sure to mark the center of the CD as well.  Next pin the waste canvas to the felt.  On the back of the waste canvas packaging they give some examples of counted crosstitch (Alphabet and some shapes), this is what I used as a template for my letters.

Here comes the hardest part: Counting!  Count the number of columns each letter will take up and add in one column between each letter.  Cut that number in half and you will get the column (and letter) you should start with.  I started about 10 rows up from the center mark to give me a nice big cushion in the center.  Continue with your counted crosstitch.

I stitched ‘Clean’ on one side, then turned the canvas upside down and stitched ‘Dirty’.  This will allow you to rotate the CD to label your dishwasher clean or dirty.

Just for some flair I added some hearts at the top, center and bottom of the magnet; I admit I might have gotten carried away!  I just googled ‘heart counted crosstitch template’ and got a ton of results. 

Now you can remove the waste canvas.  With felt you have to be very careful when pulling out the strands of the canvas.  What works best for me is wetting the felt and canvas so it is slightly damp.  Then one by one I pull out the vertical strands.  Once they are all pulled out the horizontal strands are a cinch.

Using the CD as a template cut out around your work making sure it is centered.  Cut out an identical circle of felt to put on the back of the CD. If I were to do this project again I would make the circles a little bigger than the template so it would overlap a bit.  This way I wouldn’t have to cut an additional strip for around the side.

Lastly glue the felt onto the front and back of the CD. DO NOT USE SUPER GLUE!  It discolors the felt and embroidery floss, and to tell you the truth doesn’t work all that well.  I would maybe use an all purpose craft glue instead.

Don’t forget to glue the magnet on the back and let it dry completely before using it!
Total Cost:  $2.50 for the magnets, I used scraps for all the other materials!

Friday, March 16, 2012

My Birthday Cake


Even though my family offered to make a birthday cake for me, I really wanted to practice what I learned in my cake class.  It is a chocolate cake with mint buttercream frosting, my favorite.  I can't wait to dig in!

Monday, March 12, 2012

Dry-Erase Menu Board

I don't know about you but I always have trouble remembering what meals I had planned for the week.  I buy all the items and remember the meals that I am most excited about, but midweek I always feel like I have to scramble to put some dinner on the table.  While browsing Pinterest I saw an easy project to remedy my problem.


I had a frame I got from my wonderful sister in-laws for Christmas, and a stack of scrapbook paper.  That's all you need for this quick craft! (OK, well my Cricut machine helped...and I guess you would need a dry erase marker to use it, but you get the idea!)

Just cut out the word menu, and the initials for each day of the week and paste on a complimentary color paper.    Frame it up and hang it up! That's it!

The glass on the frame will act as a dry erase board.

Total cost: Free!  :)

Tuesday, March 6, 2012

Cake Batter Bars

These are SOOOO yummy! They taste like Funfetti cake mix but with a brownie texture.

You can get the recipe here: http://www.lovintheoven.com/2011/08/cake-batter-bars.html

I only made one edit to the recipe; I cut the amount of granulated sugar in half because it was just a little too sweet for me. Use your own judgement- seriously they are good either way!

Thursday, March 1, 2012

Yarn and Felt Flower Spring Wreath

As Promised.....

You can learn how to make this wreath in my previous post, but I did add one new type of flower. The large purple rose.

Here is the tutorial: http://www.howjoyful.com/tutorials/

I originally had several different colors of flowers on this wreath, but I thought it looked cluttered and mismatched.  I kinda like the way it looks with all neutrals and one strong color for *pop*

Best Ever Shredded Chicken Burritos


This Crockpot recipe is one of my new ultimate favorites. Are you ready for how easy this is?!!

3 Lbs boneless skinless chicken breast
1 Jar Salsa
1 Taco seasoning packet

That’s it. Put in Crockpot on low for 8 hours, and gently shred the chicken with a fork.
Put this chicken in a burrito with your favorite toppings and enjoy! We even had leftovers and put it in quesadillas a few nights later and they were amazing.

Pictures cannot do this meal justice. Period.

Tuesday, February 28, 2012

Lessons from Cake Class


  1. Oven temperatures can fluctuate over a span of 50 degrees in the process of baking.  So if you set your oven to 350 degrees, it will be cooking your cake from anywhere between 300-400 degrees.  This is what makes your cake dome on the top (which is bad).
In order to bake your cake at the desired temperature:
1.       Let your oven preheat an extra 15 minutes before you put your cake in.  When you open the door the heat level will drop drastically, letting it heat up the extra 15 minutes will keep the temperature up.
2.       Place a pizza stone or unglazed terracotta tiles on the bottom rack of the oven.  The stone (and tiles) will absorb the heat when the oven is in a warming cycle and release the heat when it is on a cooling cycle.  This will make your cake bake more evenly.
3.       Wilton Bake Even strips. I haven’t tried them yet myself, but my classmates swear by them; the tops of their cakes were almost perfect so I am sure they work.  Basically they are strips of heat resistant fabric that you soak in water and pin around the base of your cakes. The moisture prevents cracking and prevents doming.
  1. How to make a cake mix taste homemade
    1. Instead of using vegetable oil as the instructions call for, use one stick melted butter.  Yes, it is indulgent; but it is cake! Cake is supposed to be indulgent!
    2. Instead of using water, substitute any clear juice. Don’t worry, it won’t taste anything like the juice you put in.  It just comes out as a background flavor that no one will be able to place.  I used Capri-Sun, all of their flavors are clear and one pouch is exactly one cup.
    3. When making chocolate cake instead of using water (or juice) use coffee.  I hate the taste of coffee, but in the cake it just makes it taste more chocolate-ey!
  2. Fillings for your cake
    1. I LOVE caramel!!! This is the easiest caramel sauce to make, and it is super thick.  Oh yeah, and it is only one ingredient- sweetened condensed milk.  Take the wrapper off the can of milk and submerge it in water in your Crockpot. Cook it on high for 8 hours then cool it in the fridge for several hours.  When you open the can it will be ooey gooey caramel.  Delicious.
    2.  Chocolate Ganache. I haven’t tried this recipe, but I am told it is fool-proof.  Take one carton heavy cream and heat it on the stove to almost boiling.  Add 12 oz dark chocolate chips.  Stir.  When it has completely melted, chill it in the refrigerator for 30 minutes.  It also makes a great ice cream topping…so I am told!
  3. Frosting your cake is super easy…if you have the right tools
    1. Get a cake turntable. Seriously.
    2. The huge icing tip is a huge timesaver.  I will never ice a cake without it now.  I am spoiled. Tip 789
    3. Use and offset spatula, the straight ones make you put your fingers in the cake.
By the way, never lift the spatula off the cake. Always swipe it off the side of the cake.  This way you won’t pull crumbs to the top of the icing.
    1. Use one tablespoon of meringue powder in your butter cream.  If you let the cake harden in the fridge for 30 minutes or so, you will be able to put that smooth finish on your cake.  Take some parchment paper and set it on the top of the cake
  1.  Making professional looking cupcakes is way easier than I thought.
    1. There is a special tip for filling your cupcakes.  You can use more frosting, or a specialty filling. Tip Bismark 230
    2. As long as you have the right tips, your cupcakes will look EXACTLY like the ones in cake shop windows. Tips 1M, 22, 12
  2. Taking a cake decorating class was way better than learning it on my own.  I can’t tell you how much I learned and how excited I am to take a fondant class.  I highly recommend it. 
Note: Please be kind when critiquing my cake.  It was my first time piping lettering and I know it is terribly off center and not parallel. I am sure it annoys me way more than it annoys you, because it KILLS me. J

Tuesday, February 21, 2012

Yarn Wreath with Crochet and Felt Flowers


I LOVE this project!
It was really quick (it only took me about one week of about an hour or so a night) and cheap with dramatic results.  I always strive for my crafts to look store bought and expensive.  Not to pat myself on the back but…. I think I definitely hit the mark on this one!
Materials needed:
·         One skein Yarn, (two if you want a complimentary color for roses, scrap yarn will probably be enough for at least a rose or two though)$3
·         Foam Wreath (Mine was about 12 inches in diameter and flattened on top with rounded sides)$5
·         Felt squares (In the kids section in Michaels, a steal at only 29 cents a sheet!)$2
·         Fabri-Tack (my favorite fabric adhesive, but feel free to use what you are comfortable with)$4
The yarn part of the wreath is easy enough…just wrap  the yarn around over and over until the whole wreath is covered and tie off in back.  I made sure mine was neat and made sure none of the yarn was overlapping.  I have seen variations of this wreath with loads and loads of yarn piled on in every which way, that can be cute too; but I am way too OCD for that.
Now for the fun part…the flowers.  Ok, I admit none of these flowers are my original designs.  This section will have lots of links, but these were the links I found most helpful for me!


To attach the flowers I used floral picks with pearls on the end. They are totally unnecessary but I love pearls and couldn’t resist.  The Fabri-Tack worked great to attach all of the flowers to the wreath with only a few seconds of holding it in place.
That’s it!  I gave this one to my mother because it reminded me of her, but the very next day I was back at Michaels for more materials.  My next project is an Spring themed one for my front door! No worries-I will post a pic of that one too!

Total cost: $14

Friday, February 10, 2012

Crochet Blossom Pillow


As you know I just finished my Ripple Crochet Afghan.  I wanted to make one more pillow that was a little different and had some texture.  I found this blog (http://attic24.typepad.com/weblog/blooming-flower-cushion.html) with a wonderful tutorial for what I call the Blossom Pillow.  This was a really quick project, it only took me 4-5 hours to complete over the course of three days.  Keep in mind this blogger is from Europe and apparently crochet stitches are different across the pond!  Make sure you read her notes at the beginning of the tutorial for the conversions!
Total Cost: $7.50 (for pillow form)

Ripple Afghan


I am finally getting to decorating the living room.  The walls are yellow and the couches are brown, so naturally I leaned towards green (coincidentally my favorite color) for an accent hue.  I whipped up a fun afghan for the kick off of all my living room projects.
I found this pattern (http://lemondedesucrette.wordpress.com/2011/08/05/summer-time-ripple-the-graphic-pattern/) on Pinterest .  I love it because you can make it any size you need!  I made my afghan EXTRA WIDE, (about the size of the top of a king size bed).  It is great for sharing on movie date night with the hubby!
The hardest part about this pattern is deciding how many chains to make when you first start.  It has to be a multiple of 11 plus four chains.  You want to make it a little longer than your desired length because it will shrink a bit when you start the ripples.  Once you get to the second row, you won’t need the chart anymore and you can pretty much crochet on auto-pilot.
Total Cost: $40 (I got all the yarn BOGO!)

Easy Peasy Pillows


Buying readymade pillows can be VERY expensive, so I decided to make mine.  The trick is to play the sales.  I bought my pillow forms from Joann’s when they were 50% off, so they were just $5 each for the 20 inch square forms.  The home décor fabric was 40% off and I bought 3 yards for $18.  And lastly, I needed piping, I bought 3 packages for $1.50 each.   All in all I spent $40 for three large pillows. Most of the large premade pillows I found were that price for one!

Ok… as promised, the directions for Easy Peasy Pillows:
With the fabric still folded over, cut three squares 20 inches wide by 20 inches tall (or however big your pillow form is).  With right sides facing in, pin your piping between the two layers.  The rounded side should face the inside of your pillow.  I like to start in the middle of one of the sides working towards the corners.  When you get to a corner, you have two choices: square or rounded.  I like rounded, but use your own discretion!

You will need to leave almost a full side open to fit the pillow form in.  On the last side that you need keep open I recommend machine sewing the piping down on one side; this will minimize the amount of hand sewing you will need to do.  When you finish your three sides and four corners flip the pillow right side out.  Insert the pillow form and pin the open sides together.  Using a ladder stitch hand sew the final side together.
See! Easy Peasy!

Total Cost: $40

Saturday, January 7, 2012

Strawberry Brownie Cupcakes


I just finished frosting these cupcakes for my sister's birthday! They are SOOO good! (I had to do some quality control before I bring them to my family's house tomorrow!)

They were really easy to make too! Just buy one box of brownie mix and one box of strawberry cake mix.  Prepare each according to the box.  Preheat the oven to 350 degrees.

I use cookie scoops to make sure there is an even amount of brownie batter and cake batter in each tin.  Put in one scoop brownie and one scoop cake, the tins should be 3/4 of the way full.  Just before you put them in, turn the oven down to 325 degrees.  Cook for 23-25 minutes.

Cool completely before frosting. (I used the Wilton recipe for simple buttercream.)

Check out the finished project!  

...drool...

Friday, January 6, 2012

Math Nerd Love Notes


WARNING! This post combines algebra, emoticons and a mushy love note all in one.
Ok so I saw this equation on Pinterest and LOVED it!  For those not fluent in mathematical equations, it uses basic algebra principles to simplify the problem down to I <3 u (which means ‘I love you’ in the emoticon world).  All together now…awwwww!
I admit I was a math major in college and this might not appeal to everyone, but I knew I had to somehow display this in my house.  The upstairs bathroom had a blank wall that was begging for a picture or something to dress it up, so this seemed like the perfect solution! 
I bought several sheets of scrapbook paper (on sale!) in shades that coordinated with our color scheme and then used my Cricut machine to cut out the numbers in the equation.  I used a tape runner to stick the pieces onto my backdrop color and added some flourishes for flair.  The cartridges that I had didn’t have negative signs or the inequalities so I just drew them in with a marker.  I had an extra matted frame in my stock so I framed it up!
 I think it looks awesome, even if people don’t get it! J
Total Cost: <$2.00 (had to use the inequality there!) 

Thursday, January 5, 2012

Drab Dining Room Quick Fix

Earlier this month the hubby and I finished wallpapering and then painting (don’t ask…) the dining room; the only thing we had in the room was a table and 4 chairs (again don’t ask …J).  The room was looking a little sparse, and we were planning on having lots of family over for the holidays so we needed a dramatic centerpiece; and it needed to be cheap!
So I decided to take a trip to the Eastern Rensselaer County Community Warehouse in Hoosick Falls, NY.  It's a great place to get second hand items on the cheap.  I collected fifteen or so different looking glass candleholders, goblets and glasses.  Anything with interesting shapes or curves looks awesome… don’t worry about colored glass, ugly paintings or gold rims; they won’t show. 
I also stopped at the local big box store and picked up two cans of spray paint in white gloss (any color would work, but I chose white for a classic modern look. 
Softly scuff the glass with fine grit sandpaper, then clean and thoroughly dry before spray painting.  I like to cut one side off of a moving box to use as a backdrop for spray painting.  Make sure to move in slow smooth motions 8-10 inches away from whatever you are painting.  Let dry overnight and spray with another coat in the morning. 
Below you can see the before and after of my project!
Total cost: (drum roll please…) $10.00!!!!!

Before:
 After: