Tuesday, May 22, 2012

Hand Dyed Canvas Slip-On Shoes


To go along with my new obsession with dyeing clothing I decided to dye a pair of canvas shoes.  As soon as I did this, I saw a commercial for the same shoes in Old Navy with a $15 price tag. I got them beat! My shoes only cost me $7! Woo Hoo!

Materials:
Wal-Mart white canvas shoes $4.50
Liquid RIT Dye $2
Elastic $0.50
Fabric Tac glue or needle and thread (leftover from previous casual crafting)
1 cup salt (who doesn’t have this in their pantry)

  • ·         Fill up your stainless steel sink (or large bucket) with steaming hot water.  Fill it up just enough to cover the shoes completely.
  • ·         Remove the laces from your shoes.
  • ·         Dunk the shoes in the hot water until saturated and set aside.
  • ·         Pour in half of the RIT dye and add in one cup of salt. Stir until salt starts to dissolve.
  • ·         Put in your shoes! Mine wanted to float right side up, so I used a plastic spatula to keep them in the dye.
  • ·         Stir them around for a few minutes until you get the color that you want.
  • ·         Drain the sink and run warm water over your shoes until the water runs clear. (make sure to dump out the water in the toes!)
  • ·         Put them outside to dry for at least a few hours.  Because it was rainy out this week it took 3 days for mine to dry inside. Sigh. I am not patient enough for that.
  • ·         Cut two pieces of elastic for under the tongue of your shoes. My pieces were about 3.5 – 4 inches long.
  • ·         I initially wanted to stitch the elastic in, but the canvas is pretty thick and I am lazy so instead I used fabric-tac. Haha.
  • ·         Use the fabric-tac to glue the elastic on either side of the tongue. Let dry.
  • ·         Show off your awesome shoes!


Total Cost: $7


Sunday, May 13, 2012

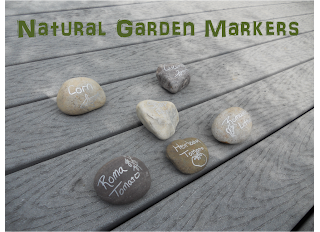
Natural Garden Markers


Well, mostly natural. All you need are some pretty rocks and a Sharpie Marker. I used the silver metallic color because it is what I had in my junk drawer, but I am sure any color would work just as well.

Find the rocks you like, preferably with one flat side and large enough to stay put where you need them. Wash all of the dirt off and thoroughly dry. Once they are dry you can mark them up! 


Easy Peasy. 
Go easy on this picture, I had been digging in the garden for a few hours by this point!

Saturday, May 5, 2012

5 Minute Ombre dye T-Shirt


The first of many I am sure.  This was so easy to do and it only took 5 minutes!  I am seriously going to ombre dye everything I can find this summer.  I might be addicted.

Materials:
$5 Wal-Mart Cotton T-Shirt
RIT liquid Dye
1 Cup Salt

1)  Fill your sink with hot water.  I filled it with steaming hot tap water to about 5-6 inches deep.
2)  Wet your shirt in the water (the one you are dying, not the one you are wearing). Wring it out so it isn’t dripping, and lay it flat on the counter so there are no wrinkles.
3)  Pour in half the bottle of dye and one cup of salt.
4)  Stir until the salt is mixed in with the water.
5)  This part happens quick- dip your shirt in the dye up to the neckline being careful not to splash.  Slowly lift the shirt out of the dye; stopping just below the bust line.  Continue removing the shirt form the dye, pausing at the bottom of the shirt.
6)  Pull the stopper and let the dye drain out of the sink.
7)  Starting at the bottom, run warm water over the shirt moving your way up,  Keep rinsing until the water runs clean.
8)  Lay the shirt outside on a clothesline or flat on a spare towel until thoroughly dried.

Wear with pride!

Total cost: $7.50

Friday, April 6, 2012

15 Minute Storage Bag

We got a doggie!  We are so excited to invite Cali into our family (that’s right…her name is Cali Cail… giggle)! But with the new addition came lots of STUFF...and we quickly realized we had nowhere to store it all.

The biggest issue was all of our gloves, hats, mittens and ear warmers for the early morning walks.  They ended up all over the kitchen table and countertops.  As if it isn’t hard enough keeping the counters free of clutter!
I found some scraps of home décor fabric that I used in the old apartment, and although I didn’t plan it, it was a perfect match for my kitchen! Woo Hoo!

All you need is two rectangles of fabric that are the same size and a long thin rectangle of fabric for the handle.  The size of the rectangles can be whatever you want, depending on how large you want your bag to be. For your reference I used 2- 13X23 rectangles and one 20X2.5 rectangle.
Fold one of the large rectangles in half width wise, right side facing in, and sew a line up both sides.  Do the same with the other large rectangle.
Turn one rectangle right side out and place the 2nd rectangle (still inside out) inside.   With the raw edges together fold the top down ¼ inch, and then down another ¼ inch.  Sew the hem down, getting as close to the hem edge as possible.
Now for the handle:  Fold the narrow, long rectangle in half length wise, with right sides together, and sew up the side to make a tube.  Turn the tube so the right side of the fabric is facing out. Now all you have to do is attach it to the back of your bag.
Cut it to the length you want it to be plus 2 inches. Fold both ends up one inch and pin to the bag.  To make sure the handles would be extra secure I sewed them on in the shape of a box with an ‘x’ inside of it.  If you are not comfortable with this you can just do zigzags back and forth for the full one inch.
Done.  15 minutes right?!
Total Cost: Free if you use scraps!
Here it is all filled with stuff.

Monday, March 26, 2012

Casual Crafting Bucket List


I am hoping if I write down my bucket list and post it for everyone (all eight of you; haha) to see it might give me some accountability; and maybe I will be pressed to actually accomplish it!  That's the hope anyway.

Mallory's Casual Crafting Bucket List
[In no particular order]
  • Knit a sweater I would be proud to wear
  • Enter a quilt into a local fair (and win; or place; or get a ribbon...umm...maybe just enter)
  • Reupholster an antique chair
  • Sew a dress from a pattern (without skipping steps and actually following the directions)
  • Start an Etsy shop or small crafting business
  • Learn how to machine quilt (and no longer be just a 'topper')
  • Invent a crochet pattern
  • Learn photography and photoshop
  • Make a wedding cake
  • Learn how to ombre dye
My goal is to finish one of these tasks before the start of next year. But as we all know- the best laid plans...

Wednesday, March 21, 2012

Dishwasher Magnet


This is a must have for any kitchen...I don't know how I got along without it!
Ok, ok that might be a little bit of an exaggeration, but it is handy!

My husband always leaves the dishes in the dish rack above the dishwasher instead of putting the dishes in the dishwasher itself (where they belong!).  The excuse is always the same- "I didn't know if they were clean or dirty!"

Much to my husband’s dismay, I made a magnet for the dishwasher that shows if the dishes inside are clean or dirty. (Insert maniacal laughter here)

Items needed:
Waste Canvas
Felt
Embroidery Floss
Needle
4 Pins
Glue (not super glue, as I found out the hard way)
Old CD or DVD
Magnet

Trace the outline of the CD onto the waste canvas, and make sure to mark the center of the CD as well.  Next pin the waste canvas to the felt.  On the back of the waste canvas packaging they give some examples of counted crosstitch (Alphabet and some shapes), this is what I used as a template for my letters.

Here comes the hardest part: Counting!  Count the number of columns each letter will take up and add in one column between each letter.  Cut that number in half and you will get the column (and letter) you should start with.  I started about 10 rows up from the center mark to give me a nice big cushion in the center.  Continue with your counted crosstitch.

I stitched ‘Clean’ on one side, then turned the canvas upside down and stitched ‘Dirty’.  This will allow you to rotate the CD to label your dishwasher clean or dirty.

Just for some flair I added some hearts at the top, center and bottom of the magnet; I admit I might have gotten carried away!  I just googled ‘heart counted crosstitch template’ and got a ton of results. 

Now you can remove the waste canvas.  With felt you have to be very careful when pulling out the strands of the canvas.  What works best for me is wetting the felt and canvas so it is slightly damp.  Then one by one I pull out the vertical strands.  Once they are all pulled out the horizontal strands are a cinch.

Using the CD as a template cut out around your work making sure it is centered.  Cut out an identical circle of felt to put on the back of the CD. If I were to do this project again I would make the circles a little bigger than the template so it would overlap a bit.  This way I wouldn’t have to cut an additional strip for around the side.

Lastly glue the felt onto the front and back of the CD. DO NOT USE SUPER GLUE!  It discolors the felt and embroidery floss, and to tell you the truth doesn’t work all that well.  I would maybe use an all purpose craft glue instead.

Don’t forget to glue the magnet on the back and let it dry completely before using it!
Total Cost:  $2.50 for the magnets, I used scraps for all the other materials!

Friday, March 16, 2012

My Birthday Cake


Even though my family offered to make a birthday cake for me, I really wanted to practice what I learned in my cake class.  It is a chocolate cake with mint buttercream frosting, my favorite.  I can't wait to dig in!