Tuesday, May 22, 2012

Hand Dyed Canvas Slip-On Shoes


To go along with my new obsession with dyeing clothing I decided to dye a pair of canvas shoes.  As soon as I did this, I saw a commercial for the same shoes in Old Navy with a $15 price tag. I got them beat! My shoes only cost me $7! Woo Hoo!

Materials:
Wal-Mart white canvas shoes $4.50
Liquid RIT Dye $2
Elastic $0.50
Fabric Tac glue or needle and thread (leftover from previous casual crafting)
1 cup salt (who doesn’t have this in their pantry)

  • ·         Fill up your stainless steel sink (or large bucket) with steaming hot water.  Fill it up just enough to cover the shoes completely.
  • ·         Remove the laces from your shoes.
  • ·         Dunk the shoes in the hot water until saturated and set aside.
  • ·         Pour in half of the RIT dye and add in one cup of salt. Stir until salt starts to dissolve.
  • ·         Put in your shoes! Mine wanted to float right side up, so I used a plastic spatula to keep them in the dye.
  • ·         Stir them around for a few minutes until you get the color that you want.
  • ·         Drain the sink and run warm water over your shoes until the water runs clear. (make sure to dump out the water in the toes!)
  • ·         Put them outside to dry for at least a few hours.  Because it was rainy out this week it took 3 days for mine to dry inside. Sigh. I am not patient enough for that.
  • ·         Cut two pieces of elastic for under the tongue of your shoes. My pieces were about 3.5 – 4 inches long.
  • ·         I initially wanted to stitch the elastic in, but the canvas is pretty thick and I am lazy so instead I used fabric-tac. Haha.
  • ·         Use the fabric-tac to glue the elastic on either side of the tongue. Let dry.
  • ·         Show off your awesome shoes!


Total Cost: $7


Sunday, May 13, 2012

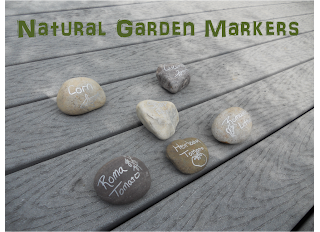
Natural Garden Markers


Well, mostly natural. All you need are some pretty rocks and a Sharpie Marker. I used the silver metallic color because it is what I had in my junk drawer, but I am sure any color would work just as well.

Find the rocks you like, preferably with one flat side and large enough to stay put where you need them. Wash all of the dirt off and thoroughly dry. Once they are dry you can mark them up! 


Easy Peasy. 
Go easy on this picture, I had been digging in the garden for a few hours by this point!

Saturday, May 5, 2012

5 Minute Ombre dye T-Shirt


The first of many I am sure.  This was so easy to do and it only took 5 minutes!  I am seriously going to ombre dye everything I can find this summer.  I might be addicted.

Materials:
$5 Wal-Mart Cotton T-Shirt
RIT liquid Dye
1 Cup Salt

1)  Fill your sink with hot water.  I filled it with steaming hot tap water to about 5-6 inches deep.
2)  Wet your shirt in the water (the one you are dying, not the one you are wearing). Wring it out so it isn’t dripping, and lay it flat on the counter so there are no wrinkles.
3)  Pour in half the bottle of dye and one cup of salt.
4)  Stir until the salt is mixed in with the water.
5)  This part happens quick- dip your shirt in the dye up to the neckline being careful not to splash.  Slowly lift the shirt out of the dye; stopping just below the bust line.  Continue removing the shirt form the dye, pausing at the bottom of the shirt.
6)  Pull the stopper and let the dye drain out of the sink.
7)  Starting at the bottom, run warm water over the shirt moving your way up,  Keep rinsing until the water runs clean.
8)  Lay the shirt outside on a clothesline or flat on a spare towel until thoroughly dried.

Wear with pride!

Total cost: $7.50